How to Publish Notion Blog Posts to Webflow CMS Automatically
If you’re tired of copy-pasting articles from Notion into Webflow, there’s a better way. With SyncFlow — a purpose-built Notion–Webflow sync tool — you can publish blog posts automatically to your Webflow CMS the moment they’re created or updated in Notion. This guide shows you exactly how to set it up, plus pro tips to keep your workflow fast, consistent, and scalable.
Why automate Notion to Webflow publishing?
- Single source of truth: Draft, edit, and approve content in Notion — let Webflow reflect it automatically.
- Zero manual copy-paste: Eliminate formatting headaches, broken links, and missed fields.
- Faster publishing: Auto-Sync and Auto-Publish push updates in near real time.
- Consistent design: Choose inline styles or CSS classes for perfect brand consistency in Webflow.
- Technical content ready: Built-in code highlighting and TeX rendering for developer and academic posts.
- Scales with your team: Unlimited syncs, databases, and connected fields on the Standard plan.

Step-by-step: Automatically publish Notion blog posts to Webflow CMS
Follow these steps to set up a reliable Notion→Webflow pipeline with SyncFlow.
- Visit SyncFlow and connect accounts
- Go to the SyncFlow website: https://syncflow.ybouane.com/ and click Get Started.
- Approve access to your Webflow sites when prompted.
- Sign up or log in to your SyncFlow account.
- Launch the app in Webflow
- In your Webflow Designer, open the Apps panel and launch the SyncFlow app.
- Connect your Notion workspace
- In SyncFlow, click Connect Notion and select the specific Notion page or folder that includes your blog database.
- Create a new sync task
- Click Sync a new database in SyncFlow to begin mapping your Notion database to a Webflow CMS collection.
- Choose your Webflow collection
- Select the exact Webflow CMS Collection (e.g., Blog Posts) you want to keep in sync.
- Pick or create your Notion database
- Choose an existing Notion database or create a new one. If you create new, SyncFlow can preconfigure the fields to match your Webflow collection.
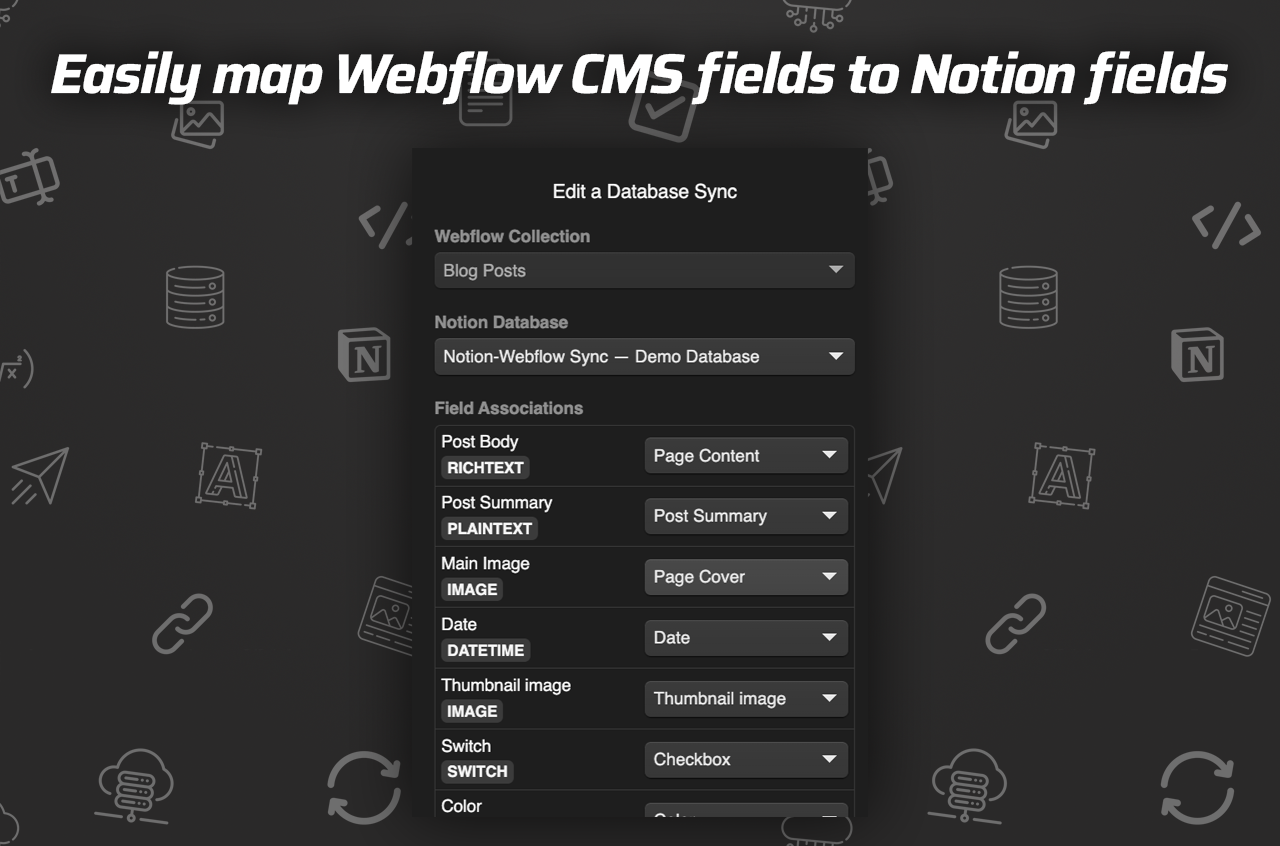
- Map fields (title, slug, summary, hero image, body, tags, etc.)
- Use the mapping UI to connect Notion properties to Webflow CMS fields: Title → Name, Rich Text → Body, Files → Main Image, Multi-select → Tags, URL → Canonical URL, Date → Published Date, Checkbox → Featured, etc.
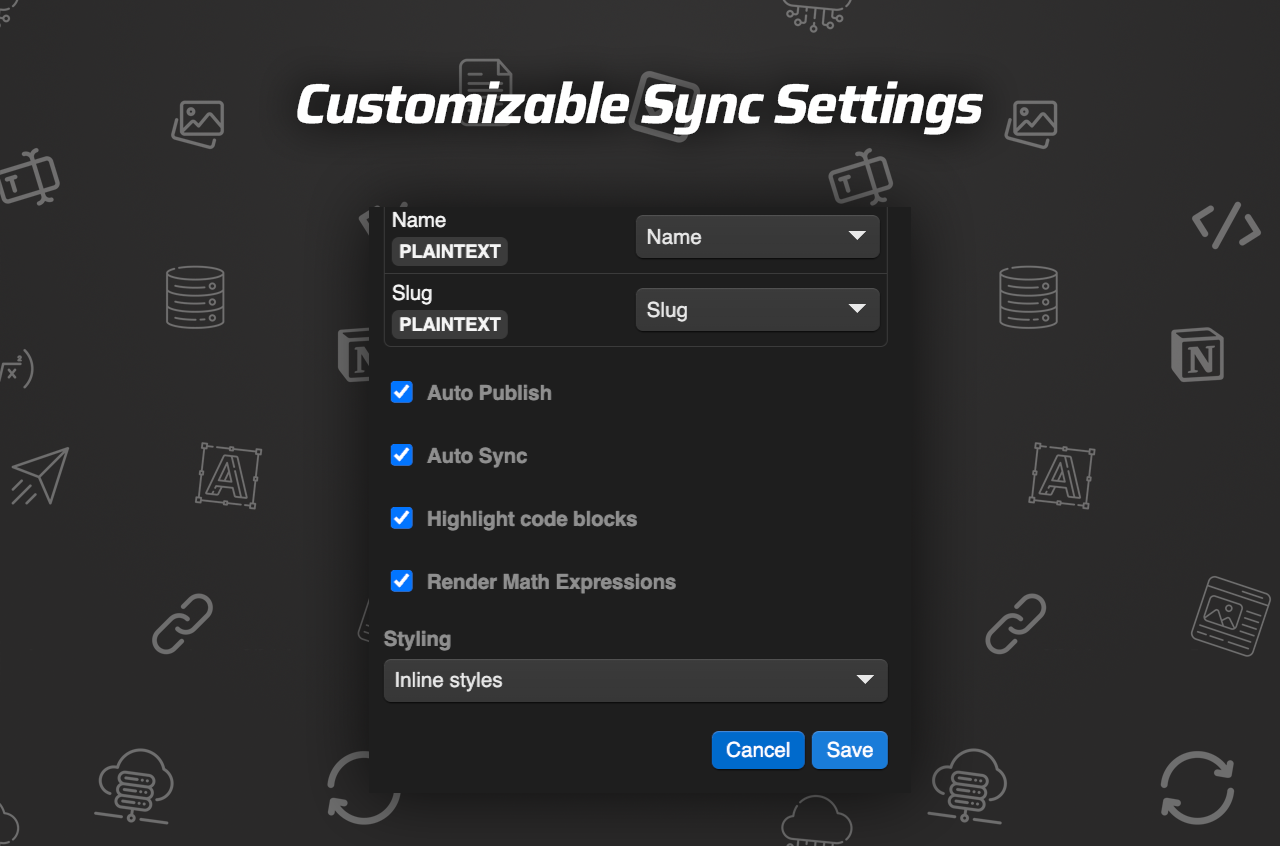
- Configure sync behavior
- Enable Auto-Sync so new or edited Notion pages automatically push to Webflow.
- Toggle Auto-Publish if you want posts to go live instantly on your Webflow site (or leave it off to stage drafts first).
- Turn on Code Highlighting and TeX if you publish technical content.
- Choose Inline Styles (fastest, imports Notion formatting) or Use Classes (lets you style everything inside Webflow via CSS classes).
- Save your settings
- Click Save in SyncFlow to lock in mappings and preferences.
- Verify with a test post
- Add a new entry in your Notion database (title, hero image, body content, tags, etc.).
- Check SyncFlow’s status and confirm the item appears in your Webflow CMS collection.
- Go live
- If Auto-Publish is enabled, your post will publish automatically. If not, open Webflow Editor/Designer to review and publish manually.
- Optional: Full re-sync
- For existing datasets, use Full Resync to align the entire Webflow collection with your Notion database.
Helpful videos:
- Full tutorial: https://www.youtube.com/watch?v=_890vYoe3KQ
- Quick trailer: https://www.youtube.com/watch?v=HGjBCLL3anc
Pro tips for a flawless Notion→Webflow workflow
- Structure your Notion database first: Include properties for Title, Slug, Summary, Hero Image, Body (Rich Text), Tags, Category, Author, Published Date, and Featured.
- Control your slugs: Add a dedicated Slug property in Notion to avoid unexpected URL changes.
- Use references consistently: If you have Authors/Categories as separate Notion databases, set up relations and map them to Webflow Reference/Multi-Reference fields.
- Pick the right styling mode:
- Optimize images: Add meaningful alt text in Notion and use high-resolution hero images for crisp displays in Webflow.
- Stage before you publish: Keep Auto-Publish off during initial setup. Once you’re confident, turn it on to go fully hands-free.
- Document your process: Save your mapping decisions and naming conventions so the whole team can contribute content without guesswork.
Pricing and getting started
SyncFlow’s Standard plan is just $8/month and includes:
- 1 Webflow Site Install
- Unlimited Syncs
- Unlimited Databases
- Unlimited Connected Fields
It’s purpose-built for content teams that want reliable, automated Notion to Webflow CMS publishing without the maintenance burden of custom scripts.
- Explore SyncFlow: https://syncflow.ybouane.com/
- Get started now: https://syncflow.ybouane.com/
FAQs
Q: Can I auto-publish the moment a Notion page is updated?
A: Yes. Enable Auto-Publish in SyncFlow and updates flow straight to your live Webflow CMS.
A: Yes. Enable Auto-Publish in SyncFlow and updates flow straight to your live Webflow CMS.
Q: How fast do changes appear in Webflow?
A: In most cases, within a few minutes. You can also trigger manual syncs any time.
A: In most cases, within a few minutes. You can also trigger manual syncs any time.
Q: Does it handle code blocks and math?
A: Yes. Turn on Code Highlighting and TeX support in SyncFlow to render both in Webflow.
A: Yes. Turn on Code Highlighting and TeX support in SyncFlow to render both in Webflow.
Q: What about Notion page links?
A: Internal links between Notion pages are automatically converted into links between the corresponding Webflow posts.
A: Internal links between Notion pages are automatically converted into links between the corresponding Webflow posts.
Q: Can I retain full design control in Webflow?
A: Absolutely. Choose Use Classes to import clean, class-based markup and style everything with your Webflow design system.
A: Absolutely. Choose Use Classes to import clean, class-based markup and style everything with your Webflow design system.
Ready to stop copy-pasting and start publishing? Set up SyncFlow once and let your Notion workspace become a true content engine for Webflow.
Get started in minutes: https://syncflow.ybouane.com/