How To Create On-Model Apparel Photos Without A Photoshoot
If your apparel brand still relies on flat lays or ghost mannequins, you’re leaving conversion on the table. On-model photos give shoppers scale, fit, drape, and emotion—without the cost and logistics of booking a studio, models, stylist, and retoucher.
The fastest path? Use AI-powered virtual try-on built for Shopify. With Supra AI Photo Studio, you can create photoreal on-model images from your existing product shots—no photoshoot required.
Try it now: Install Supra AI Photo Studio on the Shopify App Store: https://apps.shopify.com/supra-ai-photo-studio or learn more on the landing page: https://supra-ai-photo-studio.sktch.io/
Why on-model photos boost conversions (without a shoot)
- Communicates fit and fabric drape: how sleeves fall, where hems land, how denim stretches.
- Shows scale: necklaces, bags, and prints read true-to-life on people.
- Adds context and lifestyle: shoppers picture themselves wearing it.
- Reduces returns: expectations match reality.
With AI try-on, you can iterate faster, test more poses and aesthetics, and keep brand consistency across your catalog.
What you’ll need
- A Shopify store and access to your product images.
- The Supra AI Photo Studio app: https://apps.shopify.com/supra-ai-photo-studio
- Clear product photos (flat or mannequin shots work best). Higher resolution = better results.
How to create on-model apparel photos in minutes
- Install and open the editor
- Add Supra AI Photo Studio from the Shopify App Store: https://apps.shopify.com/supra-ai-photo-studio
- Open it from your Shopify admin and pick the product you want to enhance.
https://supra-ai-photo-studio.sktch.io/images/help/editor-overview.webp
- Isolate the product
- Use "Isolate Product" (background remover) to clean the image. This helps the AI read edges, silhouette, and fabric details.
- If the source is soft or grainy, run Auto Enhance and Upscale to sharpen texture without artifacts.
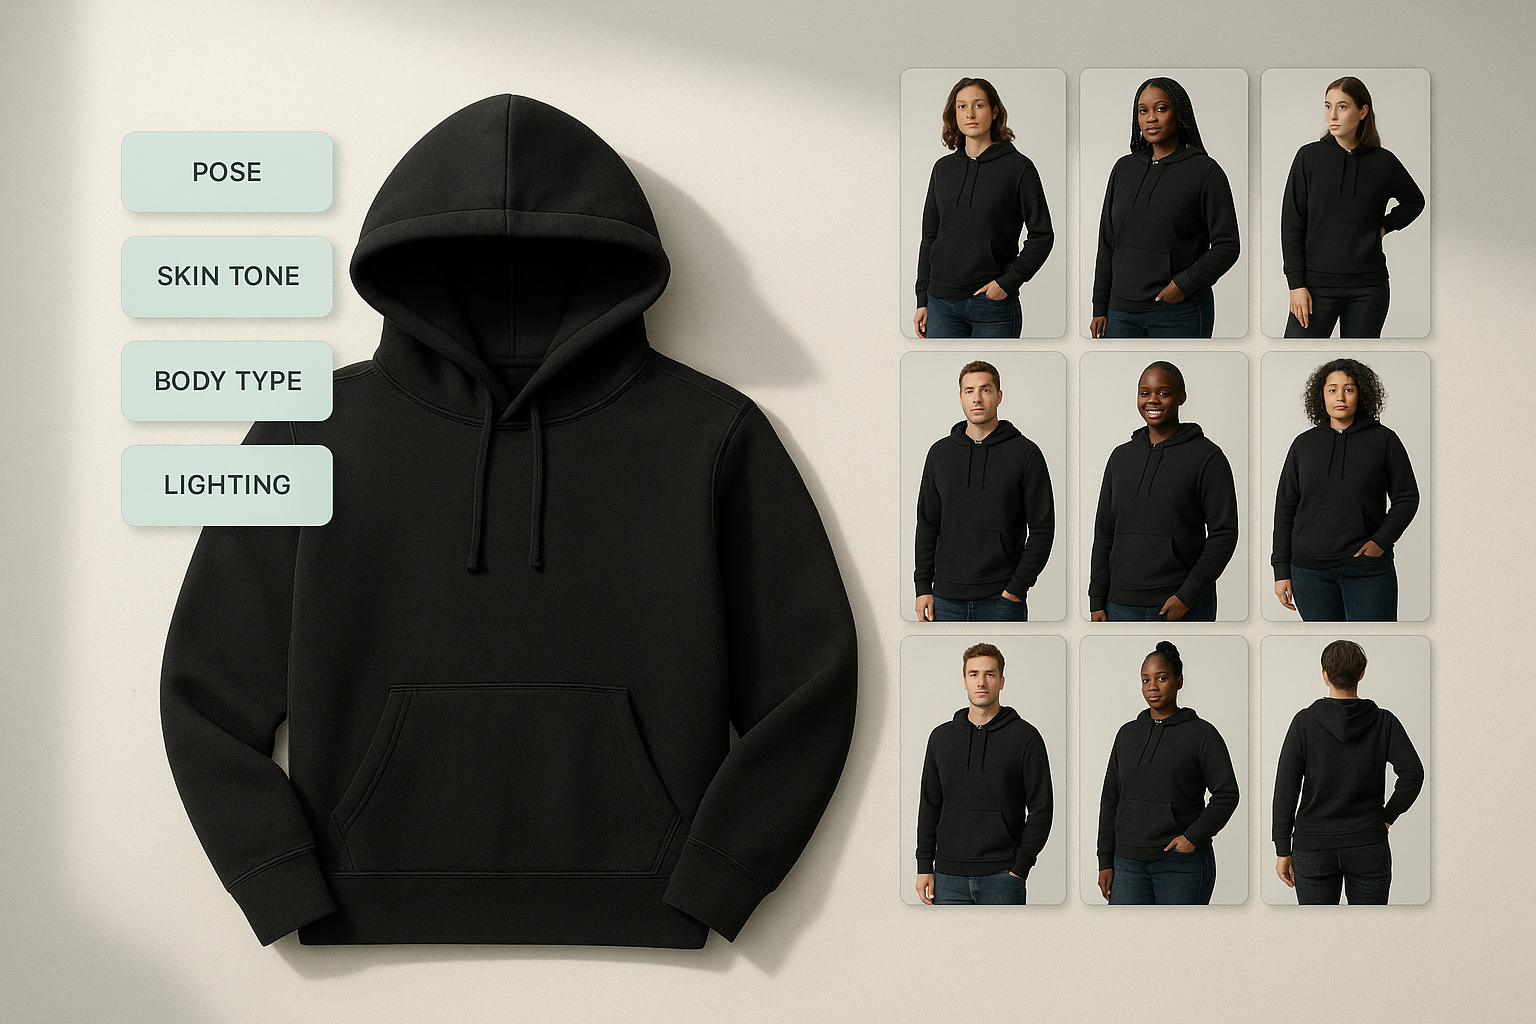
- Launch AI Try-On
- Open the Virtual Try-On tool. Choose from a library of realistic models or create your own with adjustable skin tone, body type, and pose.
- Keep brand consistency by saving a few “house models” and favorite poses for your catalog.

- Set pose, angle, and vibe
- Pick a pose that matches your garment: relaxed stance for hoodies, dynamic motion for activewear, side angle for structured jackets.
- Choose lighting that suits your brand (soft daylight, crisp studio, warm lifestyle). Consistency matters across PDPs and collections.
- Guide the AI for accuracy
- Add short instructions to preserve details: “boxy fit, cropped hem, dropped shoulders, thick rib cuffs, matte cotton knit.”
- Note tricky elements: “logo centered at chest, satin sheen, 3D puff print, transparent straps.” The AI maintains product integrity, and clear guidance helps.
- Generate and review
- Generate a batch of variations (model diversity, poses, backgrounds). Keep 3–5 winners per product for thumbnails, hero, and secondary images.
- Check edges, text/logo clarity, and fabric drape. Regenerate if you need a different pose or lighting.
- Add lifestyle context (optional)
- Use Object Placement to put your on-model shot into a scene (street, studio, boutique). Keep it subtle—your product is the star.

- Publish to Shopify
- One click to publish back to the product’s media gallery from the editor.
- Update your PDP hero, size guide images, and collection thumbnails for a cohesive look.
Pro tips for photoreal results
- Start clean: Remove busy backgrounds before try-on for the best edge fidelity.
- Describe fit precisely: “oversized,” “regular,” “tailored,” “cropped,” “high-rise,” “tapered leg” help the AI honor silhouette.
- Respect texture: Call out “chunky cable knit,” “fine rib,” “brushed fleece,” “silk satin,” “raw denim” so shine and grain render correctly.
- Match the pose to the garment: Hands-in-pocket pose sells hoodies; three-quarter turns flatter blazers; mid-step motion sells athleisure.
- Keep lighting consistent: Choose a repeatable studio or daylight look across the catalog to build trust and speed scannability.
- Show diversity: Offer a few body types and skin tones so shoppers see themselves in your product.
- Use Upscale before final export: Crisp detail increases perceived quality and click-through in grids.
From on-model photos to scroll-stopping videos
Turn your best on-model stills into short videos for ads and social:
Turn your best on-model stills into short videos for ads and social:
- UGC-style videos: Generate influencer-style clips from your product images. Choose voice, vibe, and setting—great for TikTok and Reels.
- B-Roll product moments: Add slow spins, drops, or fabric ripples while preserving your product’s details.
Watch the demo trailer: https://www.youtube.com/watch?v=M2ISy20la78

Workflow examples by niche
- Streetwear: Keep neutral studio backdrops, straight-on stance, and a slight rim light. Use a close crop for thumbnails that read bold logos.
- Contemporary fashion: Soft daylight by a window, relaxed posture, side-angle detail frames for seams and drape.
- Activewear: Dynamic poses (lunge, mid-stride), cool lighting, and tight crops on moisture-wicking textures.
- Jewelry: Minimalist backgrounds, tight portraits for scale, side-light to bring out stone facets and metal shine.
- Swimwear: Natural daylight, warm color grade, lifelike skin tone variation, and careful fit descriptors for straps and cups.
SEO checklist before you publish
- File names: hoodie-black-on-model-front.jpg (include product, color, angle).
- Alt text: “Black cotton hoodie on-model, relaxed fit, dropped shoulders” (describe, don’t stuff keywords).
- Image order: Lead with the clean hero on-model shot, then detail shots and lifestyle variations.
- Consistent cropping: Use uniform aspect ratios (1:1 or 4:5) for a polished grid.
Why choose Supra AI Photo Studio for Shopify
- Built for speed: Go from flat lay to on-model in minutes, right inside your admin.
- True-to-product: The AI preserves design, print placement, and fabric qualities.
- All-in-one: Background remover, Auto Enhance, Upscale, Object Placement, AI Try-On, UGC and B-roll videos—no juggling apps.
- Flexible plans: Start free, scale as you grow.
Get started free
- Install on the Shopify App Store: https://apps.shopify.com/supra-ai-photo-studio
- Explore features and examples: https://supra-ai-photo-studio.sktch.io/
- See it in motion: https://www.youtube.com/watch?v=M2ISy20la78
Create on-model apparel photos without booking a single shoot—and publish a consistent, high-converting catalog today with Supra AI Photo Studio.